Skills page
Camera guide
Aperture:
Aperture is the size of the hole in the lens, but is controlled on the camera body. The more open the aperture is, the more light is let through the lens to the camera sensor. When the aperture is wide open, the shallower the depth of field will be.
When the aperture is smaller, less light is let in, but that means more is in focus because the depth of field is larger. A smaller aperture also means the image is slightly sharper.
The stops that the aperture is measured in are called f stops. The more open the
aperture is, the lower the f stop number will be.
We would open the aperture up by decreasing the f/stop if: we want a brighter image
and/or we want bokeh. We would make the aperture smaller by increasing the f/stop
if: we wanted more in focus, have a sharper image and/or darken the image.
Here is an example of an image with a low f/stop (left) compared to an image with a higher f/stop (right)
As you can see, the image on the left is brighter and is not as sharp compared to the image on the right


Shutter speed
Shutter speed is the amount of time that the camera’s sensor is exposed to light. Shutter speed is measured in seconds (s) and fractions of seconds.
Shutter speed is best used when taking photographs. It is used to show movement. For example taking pictures of birds flying requires a fast shutter speed, but taking pictures of stars at night requires a slow shutter speed. Altering the shutter speed can still be used to noticeable effect whilst filming.
Increasing the shutter speed whilst filming, which is done by shortening the amount of
time the sensor takes data from the light, will reduce blur and also darken the image.
Decreasing the shutter speed whilst filming, which is done by increasing the amount of
time the sensor takes data from the light, will increase blur and also lighten the image. However, whilst filming the shutter speed ca only go down to 1/30th of a second, at
this shutter speed if you were to wave your hand in front of the lens, your hand would
blur, but at 1/320th of a second, most of the blur from your hands would disappear.
The image on the left has used a shorter shutter speed than the image on the right, on the right you can see the movement of the person from where they have moved between the time in between the shutter opening and closing.


ISO
The ISO of the camera determines how much the camera digitally brightens the image.
ISO is measured in ISO stops, the lower the ISO number, the less digitally brightened the image will be. And so, the higher the ISO number, the more brightened the image will be.
ISO starts at ISO 100 and the image is usually clear enough up to ISO 800 to be useable. As soon as the ISO hits four figures, the digital noise will be noticeable and take away from the quality of the image.
One negative effect using ISO is that it also increases the digital noise on the image. This makes pictures look grainy. Increasing the ISO is often used as a last resort as a result of this
This image used a high ISO, as you can see the image is quite grainy and bright, you wouldn't usually use ISO in outside daylight conditions like this. But rather during night time.

White balance
Before we film, we set a white balance, and what this does is tell the camera what
white looks like in this lighting condition. So, when the sensor picks up light when the
shutter is open, the sensor is getting data and giving it to the camera. From knowing
what white looks like in a certain lighting condition, the camera works out what all the
other colours will look like.
If the white balance is not set correctly it can make an image seem too orange(warm) or too blue (cold). However in certain circumstances this effect may be desired to help manipulate the image into conveying a mood.
The images here show a daylight vs shade setting of white balance, the image on the left was takn under a 'shade' setting and the image on the left used the 'daylight' setting.
As presented, the shade setting has created a warmer image with orange and warm tones, whereas the daylight image is much more cooler with blue undertones.
_JPG.jpg)

Focus and depth of field
The depth of field determines how much is in focus and how much is not in focus. In
focus objects will be sharp and clearly defined whereas out of focus objects will be
blurry and all their detail will be indistinguishable. A shallow depth of field is created
by opening the aperture up to a low f/stop.
Bokeh is part of depth of field, and is used to describe the quality of the out of focus
objects, it is created by having a shallow depth of field. It is the blurry background part of an image.
Here are two images contrasting focus and depth of field, the left image shows a wider frame with the centre object in the image being in focus, compared to the image on the right which has a more shallow depth of field, this image is also slightly out of focus a result of this..
_JPG.jpg)
_JPG.jpg)
Duplicate/twin video effect
Using Adobe Premier pro we filmed three different scenarios where we had to edit a duplicate of ourselves so the same person had to be on screen in two different places at the same time.
We did this by:
-Setting up our camera on a tripod so that it would capture our chosen location correctly
-Find out where the vertical centre is on frame and where it translates to in real life
- Start recording the first half of the scenario, for this the actor cannot cross the vertical line in frame otherwise it would make the editing process later more complicated.
-Record the second half of the scenario, not moving the camera at all in between steps, it might help to film one continuous scene and then cut out the parts you don't need
Editing steps
-Open premier and import all clips in order
- next, overlap the clips where you will want the second 'twin' to be introduced
-Add a crop effect to the second clip where the centre line is- it does not have to be centre exactly but where it fits with your video so that neither of the clips gets cut off at the line.
-Add a feather effect to the clip if the centre line is too obvious.
- Add any additional effects you would like
-export and save
Review:
Overall, I am very pleased with the outcome, I think the video effect is shown seamlessly in most of our attempts, the only issue I have is with the scene shot by the trees, as it was windy that day the background changed slightly to make the effect visible unfortunately. So therefore next time I would want to re shoot that scene somewhere else or film it on a day that was not windy etc.
By learning how to create the duplicate effect I now know how to use it for future film making tasks/challenges. I very much enjoyed learning how to create the effect as editing and filmmaking is one of my favourite areas of media and I hope to expand my knowledge of the subject further.
Documenting this task and the steps on how I created the effect will allow me to refer back to this website if I ever need to remember the steps.
180 degree rule task
For this task we must film a short scenario of two characters having a conversation. We must use the 180 degree rule on this task and our shots must be static tripod shots with no shaking.
The shots we must include are:
-Extreme wide establishing shot
-Wide shot of the entire scene (at least two takes)
-OTS(over the shoulder) mid from one angle
-OTS mid from the other angle
-Three close ups of your choice
-Extension: Include a shot with a different angle

Shot list
Here are our planned shots, we aim to stick tightly as possible to this pre planned list as it will allow the editing process to be easier as this can then be used as a guide to editing.

Storyboard
We chose to do a basic storyboard to help initial ideas develop however for this task specifically we focussed more on the shot list as a guide when filming
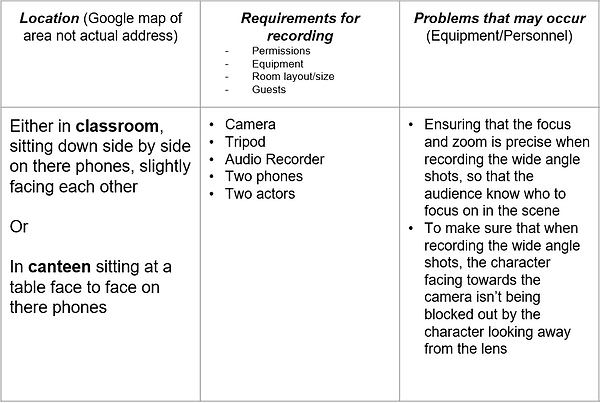
Location reece
This was our planned location reece however as shown in the final video this changed significantly as we faced some filming issues.
Reflective cycle
Plan
We were asked to make a short film roughly 45-60 seconds long, this task was meant to challenge us in regards to sticking strictly to the brief. To prepare for our task, as shown above, we created an in depth shot list and storyboard. Moreover we made sure to communicate effectively through our team to make sure everyone knew what they were doing . We decided on roles by asking if anyone had any initial preferences and then compromised over the results.
Do
With this task some of the skills we needed to demonstrate were organisation, working efficiently under pressure and effective editing skills. As a team we worked well together everyone played their role well and there was no 'weak link'. We had to change our location completely as while filming there was nowhere inside to film so we had to improvise and use a bench outside. Another issue we faced was that when going to record for the first time our microphone we had been given ran out of battery and the camera did not have the correct memory card and so non of our footage uploaded correctly, this meant we had to reshoot all of our scenes the next day. The biggest issue we then faced was trying to catch up on work as we were now significantly behind however after I had uploaded the footage onto the computer I managed to catch up on time through editing as the shot list I had created earlier could also be used as an editing guide so all I had to do was crop the shots, sync them with the audio and place them in the correct order. Some new skills that i developed with the software was learning how to use a boom microphone, this was an important part of our project as it meant we had a better audio quality if used correctly (i.e.) not too close/far away from the speaker. If I could change one thing from this project it would be that we did more initial checks on the equipment before going off to film as that would have prevented our only setback.
Review
We did successfully complete the task including all the necessary shots and aspects from the brief, one shot that was hard to film was our attempt at a birds eye view shot, for this we placed the camera on a fully extended tripod on top of a table for extra height and then aimed it downwards at the actors this was quite frustrating as it took some time trying to find the correct angle. However it did pay off and the shot was used in the final edit.
Lip syncing task
Brief
Using new lip synching techniques to create a 30 second scene
Filming and editing lip synch. You must clearly lip sync with the original song and only focus on this. You should choose one location and focus on close ups/mid shots of just lip syncing.
The song we were given was 'Never gonna give you up' by Rick Astley
Here are the lyrics
We're no strangers to love
You know the rules and so do I
A full commitment's what I'm thinking of
You wouldn't get this from any other guy
I just wanna tell you how I'm feeling
Gotta make you understand
Never gonna give you up
Never gonna let you down
Never gonna run around and desert you
Never gonna make you cry
Never gonna say goodbye
Never gonna tell a lie and hurt you
Plan
For this task we had to create a short roughly 30 second scene of lip syncing to a song. This task had more of a focus on the editing aspect as it was meant to challenge how well we could sync the audio to the visuals. To prepare for this task, first we allocated roles, we shared what we preferred to do and then negotiated from there. In this case I was directing and time keeping. We then planned our locations and had a light shot list of different angles/shots to include.
Do
The skills we needed to demonstrate was good organisation and teamwork as this task could get complicated very quickly especially when it comes to memorising the lyrics and making sure we get enough footage at each location to then use in the edit. We didn't face any major difficulties, the biggest inconvenience we did have, was mainly finding enough locations to use as we were filming on our college campus and so many places, for example, the cafeteria were too busy to film. Once we had filmed we learnt how to sync the audio to our footage in the most efficient way possible, this involved placing the music track as a base in premier pro and then individually stacking the filmed footage so that they all synced up in the correct places even if they overlapped with other clips. This then meant I could cut out parts I didn't want and not be worried about having to re sync the clips.
Review
If I could change one thing about this project it would be that we could film in places other than on college campus so I could have a bit more freedom with the locations that I think could work well with this specific song. The most enjoyable part of this task was filming as my group had a lot of fun using the camera to see what kind of shots we could get and playing with camera movement. The most frustrating part however, was the actual syncing of the audio with the visuals as it was often tedious having to pause and replay the clips to find the correct spot to cut etc. Overall, we successfully completed the task and ticked all the requirements of the brief.